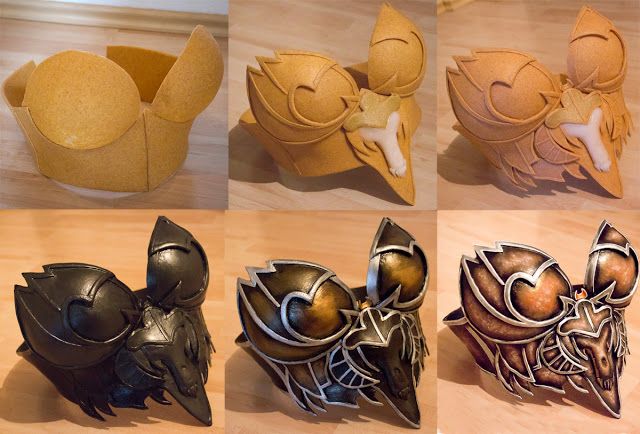
Creating cosplay armor is one of the most exciting—and rewarding—parts of bringing your favorite character to life. Whether you’re preparing for a convention, a photoshoot, or simply love the challenge of detailed costume work, making armor lets you combine creativity with craftsmanship.
In this guide, we’ll walk you through the essential steps and materials needed to build impressive, wearable armor from scratch. Whether you’re a beginner or looking to refine your skills, this article will help you turn foam, plastic, or thermoplastics into show-stopping costume pieces.
What is cosplay?
Cosplay—short for “costume play”—is a creative hobby where people dress up as characters from movies, TV shows, comic books, anime, video games, and other forms of pop culture. But it’s more than just wearing a costume; cosplay often involves embodying the character’s personality, voice, and mannerisms. For many, it’s a form of performance art and self-expression.
Cosplayers put a lot of time and effort into making their outfits as accurate and impressive as possible, often crafting costumes and props by hand. Whether it’s a simple outfit or an elaborate armored build, cosplay brings fan communities together at conventions, online, and through photoshoots—celebrating creativity, craftsmanship, and a shared love for fictional worlds.
How to make cosplay armor?

Cosplay armor is one of the most striking and complex parts of a costume. Whether you’re suiting up as a sci-fi soldier, a medieval knight, or a fantasy warrior, crafting your own armor can be both rewarding and a fun creative challenge. While it may seem intimidating at first, making cosplay armor is entirely achievable with the right tools, materials, and mindset. This guide will walk you through the process—from choosing your design to the finishing touches—so you can create armor that looks like it stepped straight out of your favorite fandom.
Plan Your Build
Before you pick up a blade or heat gun, planning is crucial. Start by choosing your character and collecting as many reference images as possible. Look for different angles, details, and color variations. Sketches or 3D models can help you understand the armor’s structure and how each piece fits together.
Once you have a clear vision, break the armor down into sections: chest piece, shoulder pads, gauntlets, greaves, etc. Think about how each piece will be worn and attached—will you need straps, buckles, or Velcro? Planning ahead will save you a lot of trial and error later.
Choose Your Materials
Most cosplay armor is made from lightweight, affordable materials that are easy to shape. The most common options include:
EVA Foam: Widely used in cosplay for its flexibility, affordability, and ease of use. Available in various thicknesses (typically 2mm to 10mm), EVA foam is perfect for everything from intricate details to large chest plates.
Worbla: A thermoplastic that becomes malleable when heated. It’s more expensive than foam but ideal for detailed or curved surfaces.
Craft Foam: Thinner and softer than EVA, great for layering small details.
Foam Clay: A moldable, air-drying material that can be used for sculpted elements.
PVC or Sintra Board: Used for more rigid builds, though harder to work with for beginners.
For most first-time armor builders, EVA foam is the best starting point.
Create Patterns
Once you know what you’re building and with what materials, you’ll need a pattern. You can:
Download Templates: Many cosplayers share free or paid templates online for popular characters.
Make Your Own: Use a body form or wrap parts of your body in plastic wrap and masking tape, then draw the armor shape directly onto the tape. Cut it off and trace the pattern onto foam.
Use Paper Prototyping: Create mockups from cardstock or poster board first to test shape and size.
Label each pattern piece clearly and mark any lines where it will need to be folded or curved.
Cut and Shape the Armor

Once you’ve traced your pattern onto your foam or thermoplastic, carefully cut out each piece. A sharp utility knife or craft knife works best for foam. Make sure your blade is sharp to avoid jagged edges.
To shape the foam, use a heat gun. Heating foam for a few seconds allows you to curve and bend it into more realistic forms. Hold it in shape as it cools to help it retain the curve.
If you’re using Worbla, it becomes soft and moldable when heated. You can form it around a base or even layer it over foam for a more durable piece.
Assemble the Armor
Attach pieces using hot glue, contact cement (stronger and more durable), or super glue depending on your material. Be patient and allow adhesives to set fully for best results.
Consider how the armor will be worn and taken off. Add adjustable straps, Velcro, magnets, or buckles where necessary. Test fit often, especially for pieces like chest armor or helmets that must fit snugly.
Add Details
Details make the armor come to life. You can use:
Foam Clay for sculpted accents
Thin Craft Foam for layered designs
Engraving Tools or Wood Burners for lines, textures, and battle damage
3D Printed Pieces for intricate or hard-to-make components
Take your time here—small details elevate the whole build.
Seal the Armor
Foam is porous, which makes painting it directly difficult. Sealing gives you a smooth surface and helps paint adhere. Popular sealants include:
Plasti Dip: A rubber coating spray that provides a flexible, even surface.
Mod Podge: Brushed on in thin coats, great for craft foam but can show brushstrokes.
White Glue (PVA): Thinned with water, applied in multiple coats.
Let the sealant dry fully before moving on to paint.
Paint Your Armor
This is where your armor really transforms. Use acrylic paints, spray paints, or airbrushing for more advanced effects. Start with a base coat, then build up layers of color, shading, and weathering to add depth and realism.
Techniques to enhance your paint job include:
Dry Brushing: Lightly brushing a small amount of paint over raised edges to highlight them.
Black Washing: Thinning down black paint and brushing it into crevices to simulate grime.
Battle Damage: Use silver paint on edges for worn metal effects or a Dremel to carve in scratches and dents.
Finish with a clear coat (matte or gloss) to protect the paint and add the final touch.
Try It On and Test It
Once your armor is complete, try it on and move around. Can you walk, sit, raise your arms? Make adjustments for comfort and mobility. Armor should look cool—but it also needs to be wearable.
Making cosplay armor may seem like a daunting task at first, but with the right approach, materials, and mindset, it’s a highly achievable and rewarding project. From planning your design and choosing materials to cutting, shaping, and painting each piece, the process is a blend of creativity, craftsmanship, and problem-solving. Whether you’re building your very first costume or looking to improve your skills, every armor project is a chance to learn and grow as a cosplayer.
A Step-by-Step Guide
Choose Your Character and Analyze the Armor
Pick a character with plenty of reference images. Front, back, and side views are essential.
Use tools like Pinterest or game model viewers (e.g., WoW Model Viewer or Blender) to find high-resolution or 3D turnarounds of the character.
Break the armor down into sections: chest, shoulders, arms, legs, helmet, etc.
Choose the Right Materials
Most Common Materials
EVA Foam (2mm to 10mm) – Lightweight and easy to shape; best for most beginners.
Craft Foam – Thin and good for small details or layers.
Worbla (thermoplastic) – Good for sculpted or curved pieces but more expensive.
Foam Clay – Great for rounded shapes, ornaments, or sculpted details.
Advice
Buy floor mat EVA foam from hardware stores as a cheap option.
Use 2mm or 5mm foam for detailed pieces, and 8–10mm for larger plates like chest or thigh armor.
Use heat-resistant contact cement (e.g., Barge) for durable bonding, especially for joints.
Create a Pattern
Methods
Download premade templates from websites like KamuiCosplay, Punished Props, or Etsy.
Make your own pattern using the duct tape method:
Wrap yourself (or a mannequin) in plastic wrap and duct tape.
Draw the armor shape on the tape.
Cut it off carefully and trace the pattern onto paper or foam.
Advice
Always label each piece with orientation (left/right, top/bottom).
Write down foam thickness on the pattern so you stay consistent during assembly.
Cut and Shape the Armor
Tools You’ll Need
Sharp utility knife or X-Acto knife
Cutting mat
Heat gun (for foam shaping)
Metal ruler (for straight edges)
Advice
Sharpen or change your blade often—a dull blade will tear foam.
Use a heat gun in circular motions to warm the foam evenly.
Hold the piece in a curved shape as it cools to set the form (e.g., over a rounded object or your knee).
Assemble the Armor
Attachment Options
Contact cement – best for permanent bonds (apply thin coats on both sides, let it dry slightly, then press together).
Hot glue – quick but not ideal for high-stress areas.
Super glue (cyanoacrylate) – works for small details or fast fixes.
Advice
Use pins or clips to hold complex curves in place while the glue sets.
Reinforce joins with foam strips glued behind seams on the inside.
Add Details
Techniques
Layer thin foam to create raised or inset designs.
Use a woodburning tool or soldering iron to engrave lines or textures.
Sculpt ornaments with foam clay and attach them after drying.
Advice
Practice your detailing on scrap foam first.
For battle damage, use a Dremel or rotary tool to carve nicks, bullet holes, or scratches.
Seal the Foam
Foam is porous, so it needs to be sealed before painting.
Sealing Options
Plasti Dip (spray) – flexible and smooth, ideal for armor that needs to bend.
Mod Podge (brushed on) – works well but may show brushstrokes.
PVA glue (diluted) – a budget option for sealing.
Advice
Use multiple thin coats (2–4) rather than one thick one.
Let each coat dry fully before applying the next.
Paint the Armor
Supplies
Acrylic paints (cheap and accessible)
Spray paints (for base coats)
Airbrush (for smooth gradients or shading)
Matte or gloss clear coat (for protection)
Advice
Start with a neutral primer (gray or black) so colors show up true.
Use dry brushing for metallic edges and black washes to simulate dirt and shadows.
Weathering makes your armor look realistic—don’t skip it!
Add Straps and Fasteners
Options
Velcro – adjustable and simple to use.
Elastic bands – good for parts that need to stretch.
Straps with side-release buckles – great for armor that needs to come on and off easily.
Magnets – perfect for hidden attachments.
Advice:
Reinforce strap anchor points with extra foam or fabric patches.
Test mobility and fit—make sure you can move, sit, and walk comfortably.
Wear-Test and Adjust
Try everything on together, ideally for an extended period (at least 30 minutes). Check for:
Discomfort or rubbing points
Loose pieces or straps
Restricted movement
Advice
Bring a repair kit to conventions: super glue, duct tape, safety pins, extra Velcro.
Label your armor pieces inside with “L” and “R” so you don’t mix them up in a rush.
Remember, perfection isn’t the goal—progress is. Start small, be patient with yourself, and don’t be afraid to make mistakes along the way. Each piece you craft brings you closer to embodying the character you love. With time and practice, you’ll not only develop impressive armor-building skills but also gain confidence in your ability to bring any cosplay vision to life.


